Category Archives: Development

Speeding Up Your Web Site with YSlow for Firebug

I’m always looking for an edge over our competitors to make using our e-commerce sites better from a usability standpoint. I think one of the easiest things to make the experience better is to make sure your site is responsive when people visit it, no matter what kind of connection they have or what they have for a computer. I decided to do some research on how to improve our sites download times and came across YSlow for Firebug.

YSlow is a Firefox extension that plugs into the Firebug extension. Any developer that doesn’t use Firebug is really missing out. So if you don’t have it, get it. Anyway, you can install YSlow right into Firefox and get access it through Firebug.

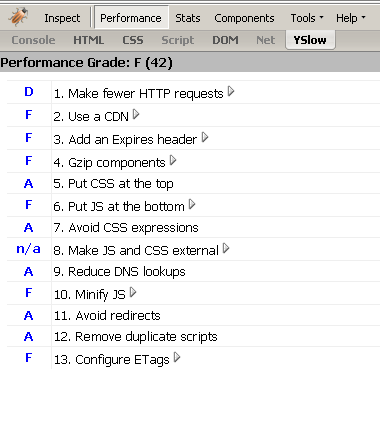
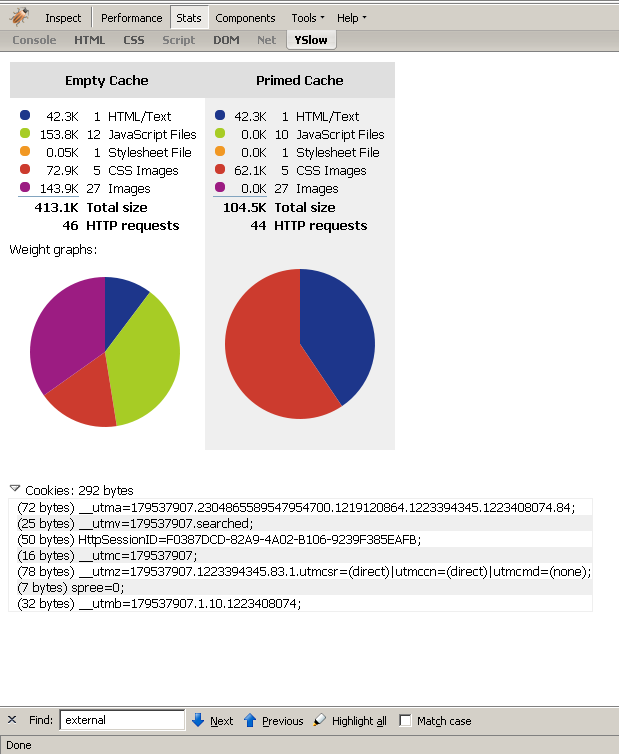
Upon analyzing our site the first time, we received a score of 42 from YSlow, which was an F. Ouch. That didn’t make me feel all that great about our site. You can see screen shots of our initial scores here and here. We scored really low for all but four of the thirteen performance criteria. I decided to attack the easiest tasks to complete first. This was Minify JS, Add an Expires header, and Gzip components.

I minified our javascript files using a utility called JSMin. It basically removes all whitespace and line returns from your file. It doesn’t compress the code all the way, but I wanted it to remain a little readable if I needed to look at the code on the live search.

Next, I wanted to handle adding an expires header. Since we use ASP.NET and C# for our web application, I was able to write a HttpHandler to do this for me. What was even better was I was able to handle the expires header and another issue, ETags configuration, all in the same snippet of code. For each request, our HttpHandler adds an empty ETag and an Expires Header of 3 days in the future. Both of these are used to determine when a cached copy of a web page needs to be refreshed. The ETag tells the browser that the version it sees now is different from the original. The Expires header obviously sets the expiration on the page.

Lastly, I wanted to GZip all of our components. This just required configuration of our IIS Server. You can also do this directly within your .NET application, but I didn’t see the value in this as IIS could do it for us.

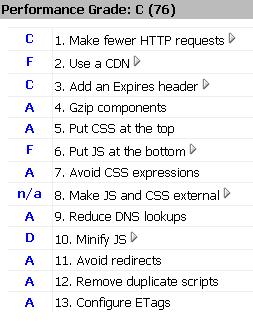
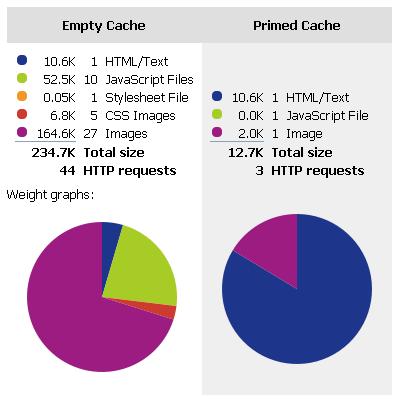
After implementing these changes and a few other mundane ones, I ran YSlow again. Low and behold, we’d gone from a score of 42 to a score of 76. Not bad! We’re now scoring a “High C” according to YSlow. From a usability standpoint, I could definitely tell that the site responded much faster than it did when we were scoring a 42. For those of you that would like to see screen shots of the stats, you can see them here and here. Looking at the stats, you can see that we cut down the data downloaded from 413.1k to 234k, which looks like a huge improvement.

I strongly recommend anyone who’s developing web applications to take a look at YSlow. You might not be able to implement changes for all of the points it says you’re not doing well for, but even 2 or 3 changes should net you some great improvements in the performance of your site.

Whats Up with Irregular and Inconsistent Google Search Results?

I’ve noticed some wackiness (at least what I consider wacky) with Google search results lately. We’ve been working slowly but surely on improving our rankings for one of our sites. We haven’t been making any sweeping changes, but instead making small tweaks here and there to title tags, meta descriptions, adding some relevant content to our pages, and getting our pages linked to from other relevant sites.

What I’ve noticed over the last week though, is that a couple times a week, we’ll drop off the face of Google search results for one of our top terms. Its not like we’re falling from #3 to #10 or from Page 1 to Page 2, but falling off the results map altogether. What’s even weirder is that a couple of days later, we’re back up to where we were before the “hiccup”.

We’ve also noticed that search results at any given time of the day can vary greatly. We can show up ranked #2 or #3 for a top keyterm, then later on in the day, #9. Or, perform one search and we’re #3 and immediately search again and we’re #6. Sometimes, I can search for a phrase and get one ranking while a co-worker can do the same search and get a completely different ranking. I’ve been trying to figure out why this happens, but I keep coming up empty.

I never expect to keep rankings forever as the web changes almost constantly, but you’d think that you’d get at least some consistency in search results. Especially for a site that is fairly well built and adheres to what Google calls best practices. But what I am really confused by is the wholesale change to our rankings for certain keywords in one fell swoop. I’d expect to see rankings slip and slip, not disappear all together.

It could very well be that all of this is just a lack of a complete understanding on how Google search results and rankings work. I’m not a complete newb to SEO, but I’m not an expert either. If anyone can enlighten and educate me on what I’m seeing in our search results, I’d be certainly grateful.

ASP.Net HyperLink Control And Html Encoded Ampersand’s

I just ran into some odd behavior with the HyperLink control ASP.Net. Per the W3C, you’re supposed to HtmlEncode ampersands, using & instead of ‘&’ when building URLs in your HTML code. The reason is that the ‘&’ is assumed to be an entity reference. What’s nice is most web browsers can recover from this type of error, but if you want your site to pass validation, you need to use & instead.

So I hooked up all of our URLs to use this method, especially when we wrote out URLs in our C# classes. What I found odd was if I did this using a HyperLink control instead of an HtmlAnchor control, .NET would write the & out in the URL instead of using ‘&’. Naturally this broke our site as query string references weren’t parsed properly. The fix was to use an HtmlAnchor instead.

I’m not really sure why .NET does this or if there’s another workaround for it, but this solution worked for me. I’d be curious to know the reason behind the behavior though.

Building Ecometry Shipping Stations Redux

I wrote about building an Ecometry Shipping Station on your own over a year ago. A few people have tried building one on their own using this guide, which is great. So I decided when I was going to build two more when we integrated UPS and were given some new Dell computers as part of a UPS subsidy (which was really cool), that I should share my experience again.

Everything worked pretty straightforward like last time, save for that the new computers don’t have PS2 ports, just USB. So our older scanners no longer work with new hardware. The configuration is as follows:

  • Dell Optiplex 740 Desktop
  • Zebra S4M Direct Thermal Printer
  • Mettler Toledo PS60 Scale
  • Symbol LS2208 Barcode Scanner

I still had to change the settings on the COM1 port to work with the scale. The settings can be found in my original post here. I also had to set the scale’s protocol to Mettler Toledo, which you can easily do following the instructions that come on the CD with the scale. Thanks to Chuck on the Ecometry Google Group for that tip. You’ll also want to be sure the baud rate and stop bits settings on the scale match up with what you set on the COM port.

The Zebra S4M printer will work just fine with UPS provided labels. If you don’t have those, get direct thermal labels. You don’t need a ribbon (and the printer isn’t configured for one from UPS anyway). Ecometry will tell you that all that works is the Z4M printers, but the S4M printer will work just fine. This is great because it costs about half as much as a Z4M.

And remember, there are no PS2 ports on these newer computer so there’s no support for older scanners, such as the PSC Powerscan PSSR-0000 or PSSR-1000. These just aren’t compatible with USB. You could perhaps get this to work with a PCI add in card such as this one and some AT to PS2 converters, but I didn’t want to spend a bunch of extra money to just hack the thing together. It seemed to be a better idea to just get all new hardware for these.

We’ve been using these new stations for a few days now and they’re working great. Feel free to drop me a line about building these. You can definitely save yourself a bunch of money building these on your own instead of going through Ecometry’s provider, Agilysys.

PayPal Doesn’t Mind Fraud?

We use PayPal exclusively (for better or worse) to collect payments on one of the e-commerce sites I manage. Recently, we noticed a lot of suspicious transactions being allowed through PayPal. High dollar value, Overnight Shipping, to shipping addresses that didn’t match billing addresses. What was odd is it seemed like it was happening all of a sudden. Turns out, we’d been hit be what appeared to be the same group for about 12 days.

I was really shocked this problem just popped up because you’d think PayPal would be on top of this sort of thing and let us know of suspicious transactions. Well, that isn’t the case. I’m not 100% sure if PayPal changed something in account settings or not, but it turns out that we had all of our Risk Controls set to Accept. Now, I’ve never seen this stuff before in our PayPal profile, but I also don’t manage the PayPal account on a daily basis.

What I found shocking, and absolutely ridiculous, is that PayPal didn’t set the defaults for these settings to the safest possible, but the unsafest. We were set to accept all transactions, regardless of address verification, credit card security verification, and a whole bunch of other settings. I couldn’t believe it when I saw it. The only reason I actually looked was that I had posed my problem to the PayPal Developer Community. Needless to say I locked the entire account down so we were as safe as possible, but I just couldn’t believe PayPal would do this by default.

It seems obvious, since PayPal isn’t a bank or even your typical credit card processor, that PayPal is just interested in collecting its fees. They probably could care less about you as a merchant and how you need protected. I’m sure we’ll be investigating other processors (which I know there are plenty of out there) to use in the future. PayPal just doesn’t seem to be the safest way to pay (pun totally intended).

Updating Pagination When Deleting Items with AJAX In Ruby on Rails

Ruby on Rails & AJAXRuby on Rails

Lately, I seem to be on a tear here with my Ruby on Rails development related posts. I suppose its more for my own documentation, but if it helps someone else out with their own development struggles, even better.

Today, I wanted to find a solution to updating pagination using AJAX. My issue was I use AJAX to update the DOM to remove an item when its deleted. However, the pagination doesn’t update and the listings don’t adjust as you delete them from the middle of the list. My solution, while not rocket science, I think is pretty cool. Basically, just keep using AJAX!

The first thing I need is a div to encapsulate my list. Something like:

     <div id="my_list">
          <%= render :partial => "items", :collection => items %>
          <%= will_paginate items, :renderer => 'ItemLinkRenderer' %>
     </div>

Obviously, that’s my original list inside the my_list div. I’ll get to what ItemLinkRenderer is in a big.

I delete my items from the list by updating the dom from within the delete action. So, something like this:

    @item = Item.find(params[:id])
    if !@item.nil?
        @item.destroy
        render(:update) { |page|
            page.remove dom_id(@item)
        }
    end

This should look pretty straight forward. Delete the item from the database, then remove it from the current document.

But what about updating the pagination and the list? We can remove an item, but how do we adjust the displayed list? Well, just fetch the list of items again.

    @items = Item.paginate :all, :page => params[:page], :per_page => 10
    if @items.length > 0
        page.replace_html "my_items", :partial => "items", :locals => {:items => @items}
    else
        page.replace_html "my_items", "<p>You have no items.</p>"
    end

Ok, so we can render the items. But, if you put this in, then start deleting items, you’ll notice your pagination links get messed up and you have your delete action in the URL. This isn’t good, but, like I mentioned earlier, this is where ItemLinkRenderer comes in. You can define a helper class called ItemLinkRenderer (in item_link_renderer.rb) to render your links properly.

    class ItemLinkRenderer < WillPaginate::LinkRenderer
        def page_link_or_span(page, span_class = 'current', text = nil)
            text ||= page.to_s
            if page and page != current_page
                @template.link_to text, :controller => "items", :action => "list", :page => page
            else
                @template.content_tag :span, text, :class => span_class
            end
        end
    end

This will render your pagination links properly. Hopefully this works out well for anyone who stumbles upon this. Let me know if it does or if you find any errors with what I’ve presented.

Accessing “Child” Associations in Ruby on Rails

Ruby on Rails
My good buddy Dan of SecondRotation.com helped me out with a Rails problem last night. I wanted to access the associations defined on an association of one of my model classes when calling find, in essence, accessing a “child” association. I looked high and low for this, but with no luck so Dan was able to come to my rescue. He said you can do this:

@collection = MyClass.find(:all, :conditions => ["id = ?", params[:id]], 
      :include => [:foo => [:bar]], :order => sort)

I guess using :include like this is will tell Rails and ActiveRecord that you want to include the Bar class association in the JOIN you’re doing in SQL so you can enhance your query. Makes sense, but too bad it seems to be hardly documented!

AJAX Pagination and Sorting in Ruby On Rails

I recently decided the account section of a Rails application I’m working on will be completely AJAX. Every link the user would click on would just replace a section of the account page giving them the impression that they’ve never left their account section because the URL isn’t changing. However, I needed to do pagination and sorting for lists of different things. So hunting on Google I went.

I first came across this article over at Rails on the Run about how to do it with will_paginate, prototype, and low pro. I mucked around with it for about 30 minutes and definitely had some struggles, so I went back to Google. I eventually came across this article at Redline Software’s Weblog about an easier way to do it with will_paginate. The nuts and bolts of it is you can use a helper class to write your pagination links for you very easily (I won’t steal their code and post it here. Check out the link to grab it.)!

But I’m not done yet. Remember, I also need to be able to sort my lists of data. So I ran with the same idea presented by Redline Software and came up with this way to write out the anchor tags for my sort links:

def sort_remote_url(text, value)
    value += "_reverse" if params[:sort] == value
    @template.link_to_remote text, {:url => params.merge(:sort => value)}
end

What sort_remote_url does is take in the text for the link and the value of the sort parameter. When you click on the sort link, it works just like the pagination and updates the current view.

Sorting Geographical Based Search Results In Ruby on Rails

Ruby on Rails

I’ve spent the last few months on a Ruby on Rails project for a client. I’m integrating a lot of different applications into it, creating quite the “mashup”. One part of the project requires the ability to search the system for results that fit within a radius of a given postal code. So to do this, I need some sort of searching algorithm or application and a geocoding application for zip code relationships. The search results need to be able to be sorted by the different attributes on the results.

So this meant I needed several pieces. One was a searching module. I found ferret and the acts_as_ferret Rails plugin to do full text searching. From what I could gather online, this was one of the best solutions out there. I want to be able to display distances between zip codes, which I can do using GeoKit. So I find myself off and running.

I was able to do everything successfully from getting the right results back to calculating distances (Side note. If you need a start with acts_as_ferret, there’s a good article here at Rails Envy). However, because the distances between zip codes are calculated and not part of the ferret index, I can’t sort by results. Uh oh…

The solution was, in my opinion, a hack, but it works. What I did was let acts_as_ferret handle sorting for everything except distances (it couldn’t do it anyway, so fine). After I get my results back, I decided, well, I guess I can sort them again, right? So, let’s do this:

@total, search_results = MyModel.full_text_search(@search_term, 
  {:sort => s},
  {:include => [:zip_code],
    :conditions => conditions})

This gets me my search results. What about distances? Well, this can be done, even though its an issue performance wise:

for sr in search_results
   sr.destination_distance = round_to(sr.zip_code.distance_to(@search_zip_code), 2)
end

So now each result knows what its distance is from the searched upon zip code. Now what about sorting?

if params[:sort] == "distance"
    search_results = search_results.sort
    @total = search_results.length
elsif params[:sort] == "distance_reverse"
    search_results = search_results.sort
    search_results = search_results.reverse
    @total = search_results.length
end

So now you’re thinking, ok, but how do you know how to sort MyModel? Easy, I decided I’d override <=> for the MyModel class so that a MyModel was less than, greater than, or equal to another MyModel based on distance. So I did this:

def <=>(item)
    if self.destination_distance < item.destination_distance
      return -1
    elsif self.destination_distance > item.destination_distance
      return 1
    else
      return 0
    end
end

So you can see with the example above, I can sort by just calling sort. To reverse the sort, just call reverse after sorting.

So there you go, sorting by distance values. There are definitely drawbacks with this method. First, you have to iterate over all of the search results to set the distance on them. Second, what if I need to sort by some other calculated value? Since I overroad <=> for distance, I can’t really do it for another value. But for now, this works. Maybe I, or someone else, can come up with a better solution.

Uploading and Resizing Images in Ruby on Rails

ImageMagick

In my previous article on using ImageMagick and Mini-Magick to manipulate images in Ruby on Rails, I talked about how to install all of the goodies you’d need to work with images in Rails. I thought I’d expand on this a little bit more and give an example on how I used this cool stuff to upload images and resize them in my Rails application.

You’ll need to set up some HTML code to upload the file to the server. Something like this will suffice:

<% form_tag :action => 'upload', :multipart => true, :id => 'upload_form' do -%>
     <input style="margin-left: 5px;" type="file" id="imageone_file" name="imageone[file]" />
<% end -%>

Now you’ll want to build a model (based on ActiveRecord or not) to save your image for you. For my use, I did based my image model on an ActiveRecord class since I wanted to at least store the file name of the image in my database. But doing that is up to you. Anyway, on to saving the image. In your class, you want to grab the data for the image file in the posted form and save it to the file system. Something like this will suffice:

def image_save(file)
    @file = file
    @content_type = file.content_type.chomp
    @original_filename = base_part_of(file.original_filename)
    @extension = @original_filename[@original_filename.rindex(".") .. @original_filename.length].strip.chomp
    
    self.file_name = "#{epoch_time()}#{@extension}"
    
    is_saved = false
    begin
      if self.file
        if self.content_type =~ /^image/
          # Make the directory for the id of the listing if it doesn't exist
          Dir.mkdir("#{RAILS_ROOT}/public/images/originals/") unless File.exists?("#{RAILS_ROOT}/public/images/originals/")
          
          # What's the new file name?
          
          # Create the temporary file
          File.open("#{RAILS_ROOT}/public/images/originals/#{self.file_name}", "wb") do |f|
            f.write(@file.read)
            f.close
          end
          
          # Crop the image to the sizes we need
          crop()
          
          is_saved = true
        end
      end
    rescue
    end
    
    return is_saved
end

So what are we doing here? First, we grab the content type of the file, its original file name, and the extension of the file. We save this information out to attributes defined on the model itself, i.e.

attr_accessor :file, :content_type, :original_filename, :extension

Then we check to make sure the directory where we want to save the original file exists, and if not, create it. Then we save the file itself. Once we have the file saved, you’ll notice I call a method called crop(). This is my method that resizes the original image and saves the resized images to the file system. How do I do that? Check this out:

  def crop()
    image = MiniMagick::Image.from_file("#{RAILS_ROOT}/public/images/originals/#{self.file_name}")
    if !image.nil?
      # Resize to 360x360
      image.resize "360x360"
      image.write("#{RAILS_ROOT}/public/images/360x360/#{self.file_name}")

      # Resize to 240x240
      image.resize "240x240"
      image.write("#{RAILS_ROOT}/public/images/240x240/#{self.file_name}")

      # Resize to 120x120
      image.resize "120x120"
      image.write("#{RAILS_ROOT}/public/images/120x120/#{self.file_name}")

      # Resize to 80x80
      image.resize "80x80"
      image.write("#{RAILS_ROOT}/public/images/80x80/#{self.file_name}")
      
      # Resize to 40x40
      image.resize "40x40"
      image.write("#{RAILS_ROOT}/public/images/40x40/#{self.file_name}")
    end
  end

As you can tell, I needed several different image sizes. You start with the lowest size and work your way down. Not doing this gets you funky sized images. MiniMagick makes it really easy to just open the file and set the new size for the image and then just write it out to where you want it. Nice!